It starts with a slight discoloration or some sagging paint on your ceiling and may end in tens of thousands of dollars of repairs if not fixed promptly. Roof leaks are one of the leading causes of damage to homes, especially here in the rainy Pacific Northwest. To avoid issues of rot and mold, I recommend that you address any leak immediately, and that usually means hiring a professional roofer. However, if you’re a homeowner, it helps to know the basics of finding and repairing the most common types of roof leaks. Knowledge is power, and knowing where to judiciously apply some caulk or replace some flashing could help you limit the damage while you wait for a roofer to apply a more permanent repair.
Step 1: Track down the leak
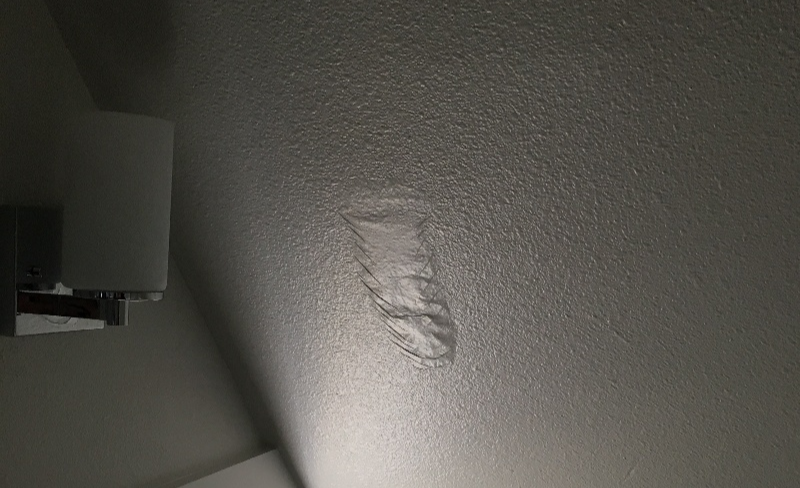
Finding water leaks isn’t always easy. The key is to be methodical and check the spots where water intrusion is most likely. In almost all cases, water gets in at roof penetrations, the places where vents, chimneys, and pipes poke up through your roof. It can also enter where dormers intersect with the slope of your roof. Check these areas first. Even if you have an older roof that is ready to be replaced, it’s unlikely that it will be leaking in the wide-open areas that are free from penetrations.
Locating leaks in the attic
You’re in luck if you have access to your attic. Just grab a flashlight and climb up there, being careful your footing is secure. Start looking for evidence above the area where you noticed the water damage. You might see dampness, dripping, water stains, or mold. Keep in mind that there may still be discoloration from old leaks that have since been repaired. If you discover dampness, you’ll know you’re on the right track. Follow it back to its source as best you can, keeping in mind that water often travels far from the source before it drips onto your ceiling.
See also: Mold 101: What to Do If You Find Mold in Your Seattle Home
Locating leaks if you have a vaulted ceiling
Locating leaks can be trickier if your home has vaulted ceilings and no attic. You’ll need to enlist a helper and go up on the roof on a dry day. For all but the flattest roofs, use a roof harness for safety. Bring a hose with you and have your helper stay inside, looking at the spot where you spotted the drip. To locate the leak, run the hose for a minute or two on the roof penetration that you suspect is leaking. Ask your helper to signal to you when water starts dripping indoors. For larger penetrations, like chimneys, start on the downhill side first, wait a minute, then move on to one side of the chimney, then the other, and finish with the uphill side. That will help you isolate where the water is getting in. If you don’t find the leak on the first try, move on to other roof penetrations, testing them out one by one.
See also: How to Properly Use a Roof Safety Harness [Family Handyman]
How to fix a roof leak yourself
Leaks often indicate that your roofing system is nearing the end of its useful life. But before you pay to have a completely new roof installed, you can buy some time by fixing minor leaks. It’s usually best to enlist the help of a professional roofer, but, for simpler fixes, you can attempt to do it yourself and closely monitor the situation to make sure your repair worked.
Fix small holes with metal flashing
One of the simplest roof repairs is to fix small holes. These might have been left from where an old satellite dish or antenna was attached. Left unchecked, these little screw holes can let in enough water to cause serious rot issues and a major repair bill. Instead of injecting them with caulk, which may be the state in which you find them, slide a piece of galvanized sheet metal flashing under the damaged shingle. A 12″ x 12″ piece of flashing, available at any home supply store, should do the trick.
Leaks around brick chimneys
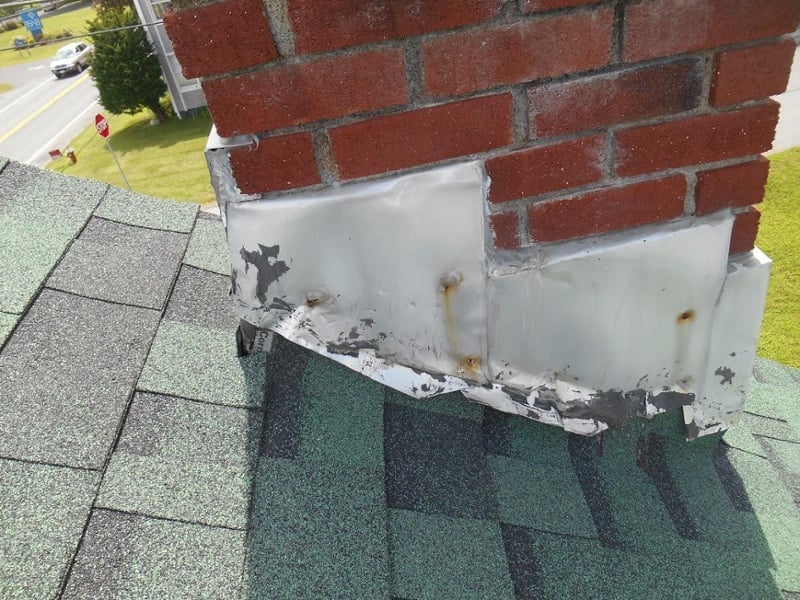
Brick chimneys are notorious entry points for water. You will have metal flashing where the chimney penetrates your roof. Sometimes this flashing can rust, especially where it bends. The most effective and longest lasting fix is to remove the old flashing. This usually involves sawing a new groove (also known as a kerf) into the mortar of the chimney and fabricating a new piece of flashing to fit. It’s a job that’s probably best left to professionals. For a short-term fix, you may be able to slip a new piece of metal flashing under the old flashing, which will divert any water that leaks through.
Clip your nails
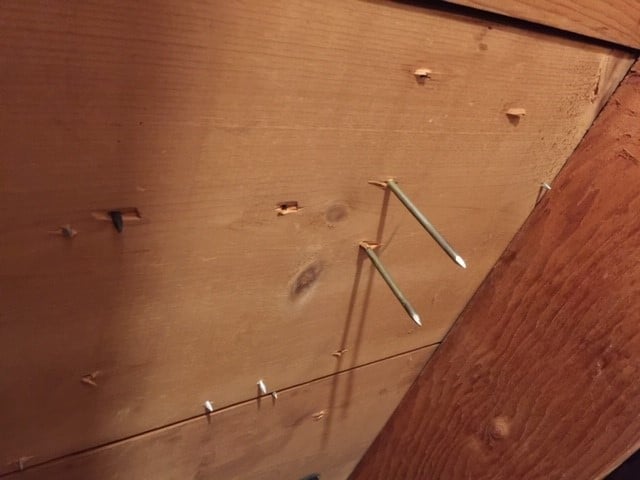
Sometimes very minor roof leaks aren’t leaks at all. When carpenters nailed down the sheathing (a plywood base layer) on your roof, they sometimes miss the rafters. The telltale sign will be nails pointing down into your attic. Not only does this make it unsafe to walk around up there, it can lead to drips. If you’re up in your attic on a cold morning, you may notice frost on these nail tips. It’s caused by moist air condensing and freezing on the cold metal nails. When the temperature rises, this frost can melt and drip down. The solution is to take a pair of side-cutting pliers and clip the nail ends off. A rotary cutting tool would also do the trick.
It may be time for a reboot
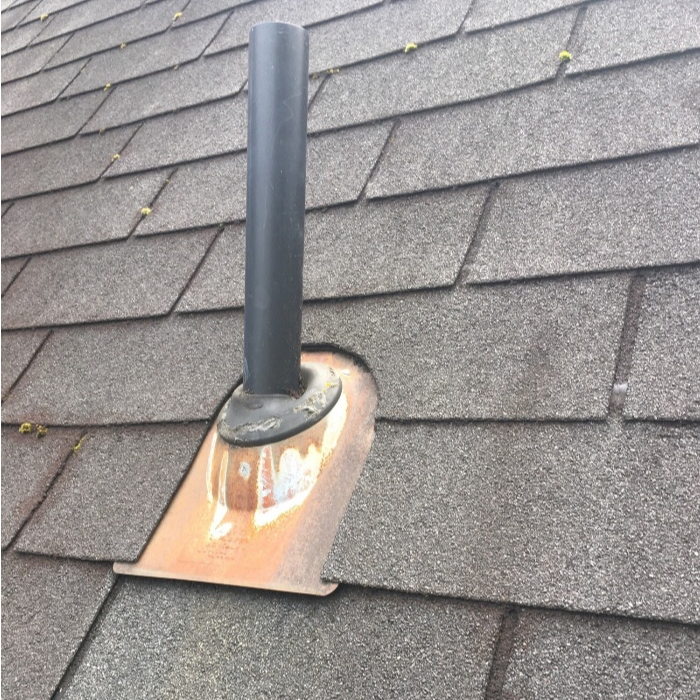
Your roof will likely have several pipes poking up through it. Each one will have a vent boot flashing, which is a rubber collar attached to a plastic or metal sheet that integrates with your shingles. It is common for the rubber to eventually disintegrate and allow water in. If you have a very steep roof, you will probably want to hire a roofer to replace the boot. But if your roof can safely be climbed, and you feel up to it, this is a repair you may want to tackle yourself. You will need an appropriately sized new boot that is made for the size pipe you are flashing. Carefully remove the old boot, removing the old nails and sliding the top edge out from under the shingles above. Be careful not to damage the shingles. Slide the new boot over the pipe and under the uphill shingles. Instead of fastening it with roofing nails and sealing those with caulk, some roofers recommend using rubber-washered screws.
Replace a leaky roof vent

The places where ventilation ducts exit your roof are prone to leaking. Look for cracks in the vent housing where it attaches to your roof. The replacement process is very similar to replacing a plumbing pipe boot and is a good DIY project if you are handy and have a flat enough roof. Buy a properly sized replacement, be careful not to damage shingles, and use screws with rubber washers to attach your new roof vent.
Deal with your dormers
Not all roof leaks originate on the roof itself. Dormers are prime suspects when it comes to water intrusion. Look for cracks in the caulking between dormer windows and the siding, and where the siding meets the corner boards. Scrape away the old, failed caulk and replace it with new exterior-grade caulk. Wind-blown rain can also find its way through knots or gaps in dormer siding. Dormer flashing is another leak-prone area, but that repair is probably best left to a professional. Even flashing that is 3 inches high can still let in water. In normal conditions, water can wick up between the siding and the flashing an inch or two, and strong wind will push it even higher. When in doubt, opt for taller flashing on vertical surfaces.
Leave complex roof repairs to the pros

More complex roof shapes are much more difficult to repair than simple gables. Soffits that meet another section of roof are notorious for letting in water and are difficult to repair. So called butterfly roofs, flat roofs, and other unusual configurations are also not ideal for DIY. And if you have a steeply pitched roof, you should not attempt to climb it without the proper training and safety gear.
One final category of repair you won’t want to take on yourself is the mystery leak. Although the repair itself may not require advanced skills, tracking a leak down to its source might. It’s far better to put a stop to the leak right away by hiring an experienced roofer than to spend weeks investigating it yourself and risk further water damage.
Our recommended Seattle roofer
Urbizo Brothers Roofing
12515 Evergreen Drive
Mukilteo, WA 9827
425-347-7142
Starting a remodel
If you are planning to remodel your home, a good place to start is with a licensed contractor or designer. Our team here at CRD has decades of experience renovating older Seattle homes and will handle all the details to keep you and your family safe during and after the remodel. If you are interested in discussing your unique situation, please don’t hesitate to get in touch.
Note: We make no claims or warranties as to the completeness or accuracy of the information on this page. We encourage you to confirm all information you read here and consult a roofing professional. Any action you take based on the information on this website is strictly at your own risk.
